Data_Reduction_Manual のバックアップ(No.2)
- バックアップ一覧
- 差分 を表示
- 現在との差分 を表示
- ソース を表示
- Data_Reduction_Manual へ行く。
- 1 (2019-09-10 (火) 22:43:03)
- 2 (2019-09-11 (水) 00:09:44)
- 3 (2019-09-12 (木) 17:48:03)
- 4 (2019-09-12 (木) 21:58:21)
- 5 (2019-09-13 (金) 18:48:29)
(STILL UNDER CONSTRUCTION)
Abstract †
- Here we present the reduction procedures of imaging data (w/o polarimetry) obtained with NIC.
- The data are assumed to be obtained with the procedures shown in the Observers' Manual (Japanese)
- This document is based on the article below:
- In modifying and editing the article, some materials provided by J. Takahashi were used.
- You can use a set of the pipeline scripts working on the host 'gamera' (192.168.42.204), which automatically reduces the raw data (not accessible from outside the NHAO).
The scheme of the data reduction †
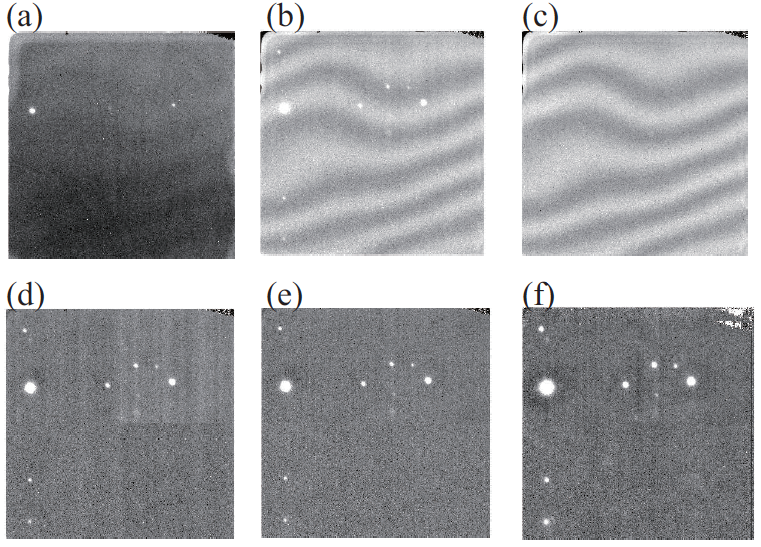
- The data reduction is outlined as follows. The names of the automatically-generated files in each step are shown in the parenthesis.
- Dark subtraction (*.da.fits)
- Flatfielding (*.fl.fits)
- Mask and interpolate the bad pixels
- Mask and interpolate the hot pixels and dark pixels (*.rr.fits)
- Generate the sky frame (*.sk.fits)
- Subtract the sky frame (*.ss.fits)
- Subtract the 'stripe' pattern of the detector (*.sp.fits)
- Match the positions by shifting the individual frames
- Coadd the frames to generate the combined image (*.cm.fits)
- Register and assign the WCS to the combined frame (*.cmw.fits)
- The figure above shows the example image generated in each step. (a) Raw image, (b) The image after the step 4, (c) The sky frame generated in the step 5, (d) Sky-subtracted image after the step 6, (e) The 'stripe'-subtracted image after step 7, (f) The final image
1. Dark subtraction †
- Use the dark frames obtained by the procedure shown here (in Japanese).
- Be sure to set the exposure time for the dark frames exactly the same as that for the object frame.
- Obtain 10-15 frames, and coadd them to generate the dark frame.
- The pipeline scripts installed in 'gamera' performs 3-sigma clipping, then averages the remaining frames.
- If the cold shutter is not set to the appropriate position, some unexpected light comes into the frame. Be sure to remove such frames before running the scripts.
- Subtract the coadded dark frame from the object frames (and also the flat frames).
- The pipeline script generates the intermediate file named *.da.fits. The example below is for J band.
After dark-subtraction j(date)_(frameID).(ObjectName).da.fits [e.g., j120717_0098.SN2012dn_01.da.fits]
2. Flatfielding †
- This step corrects for the spatial inhomogeneity of the sensitivity.
- Usually we recommend to use the twilight flat. This link (Japanese) explains how to obtain the flat frames.
- If you use the master flat frames provided by the observatory, find the frames at the nearest date in the directory gamera:/home/nhao/nic/nicred.latest/common/.
- We do not have any specially-made software tools to generate flat frames. The only NIC-specific features are those shown in the link above.
- How to generate a flat frame is outlines as follows:
- Obtain 5-10 (or more) pairs of flat frames with high- and low counts. The difference between the high- and low-count frames should be at least ~2000.
- Subtract the low-count frame from the high-count frame for each pair.
- Homogenise the count levels by scale the individual frames with the median counts, and coadd them. (e.g., use IRAF/images.immatch.imcombine with combine=median, scale=median, reject=avsigclip)
- Normalise the coadded frame so as to set the average count to be unity. (e.g., use IRAF/noao.imred.generic.normalize)
- Divide the dark-subtracted frame with the normalised flat frame. (e.g., use IRAF/images.imutil.imarith)
- The pipeline script generates the intermediate file named *.fl.fits (below is an example for J band).
After flatfielding j(date)_(frameID).(ObjectName).fl.fits [e.g., j120717_0098.SN2012dn_01.fl.fits]
3 & 4. Mask and interpolate the bad pixels and the hot/dark pixels †
- Bad pixels (appear at fixed positions) can be removed by using, e.g., IRAF/proto.fixpix.
- The table shown below are the lists of bad pixels for J-, H- and K bands. The format is "x1 x2 y1 y2", i.e., for each line,
- Mask the region with x1<x<x2, y1<y<y2, and interpolate the pixel values using the pixels around that region.
- If there are only two columns, mask only the single pixel and interpolate using the pixels surrounding the masked pixel.
- J band
277 291 134 148
186 191 229 236
260 270 1017 1023
- H band
277 291 134 148
186 191 229 236
961 962 672 673
1002 1004 652 654
1005 1006 649 651
966 967 612 619
964 966 609 614
1001 1007 646 654
13 15 242 245
- K band
140 141 549 551
162 163 806 807
162 805
163 804
164 167 801 803
162 170 795 800
171 173 798 802
186 191 229 236
277 291 134 148
320 321 586 589
321 323 591 593
778 779 682 688
780 786 671 676
779 780 677 680
785 789 670 671
- Hot/dark pixels can be removed using, e.g., IRAF/noao.imred.crutil.cosmicrays. For dark pixels, multiply the whole image with -1 and do the same thing.
cosmicrays @obj_fl.lst @obj_cr1.lst
imarith @obj_cr1.lst * -1 @obj_cr2.lst
cosmicrays @obj_cr2.lst @obj_cr3.lst
imarith @obj_cr3 * -1 @obj_cr4.lst

 obj_fl.lst:    list of the flatfielded files
 obj_cr?.lst: list of files to be generated
- The recommended parameters for IRAF/cosmicrays are: threshold>(5sigma of the sky fluctuation), fluxratio~2-10.
- You can use other tools such as L.A.Cosmic
- The pipeline script generates the files named *.rr.fits (below is an example for J band)
After removing Bad/Hot/Dark pixel j(date)_(frameID).(ObjectName).rr.fits [e.g., j120717_0098.SN2012dn_01.rr.fits]
5 & 6. Sky subtraction †
- The 'sky' here means 'winding' pattern that cannot be corrected even with the dark-subtraction and flatfielding. The procedures shown here subtracts such pattern.
- Step 5. The sky frames are generated by median-stacking the frames obtained in a set of dithering without matching the positions. (e.g., using IRAF/imcombine)
- If the stars are not so crowded, you can use the raw object frames.
- If there are many stars within the FoV, you need to obtain the sky frame containing not so many stars, but as close to the target field as possible. Make sure you use the same read-out mode and exposure time.
- The sky frame can be used even when containing several stars within the FoV.
- The procedures are outlined below. (This is not the only way. NOT necessarily the best way)
- Normalise each sky frame to the median pixel value.
- Median-stack the normalised frames. (e.g., using IRAF/imcombine with scale='median', combine='median', reject='avsigclip')
- Estimate the sky level of each object frame, and scale the sky frame to set the sky counts to the same level.
- Step 6. The sky subtraction is done by simply subtracting the scaled sky frame from the object frame. (e.g., using IRAF/imarith)
- The pipeline scripts generate the following two kinds of files (below is an example for J band)
Sky frame generated    j(ObjectName).sk.fits  [e.g., jSN2012dn_01.sk.fits]
Sky-subtracted image  j(date)_(frameID).(ObjectName).ss.fits [e.g., j120717_0098.SN2012dn_01.ss.fits]
7. 'Stripe'-pattern subtraction †
- The NIC imaging data have 'stripe' pattern coming from the detectors. At this point you need to subtract the pattern from the frames.
- This pattern is thought to be due to the voltage fluctuation that cannot be removed with the dark-subtraction and flatfielding.
- The amplitude of this pattern is almost constant for each column, at least during each dithering set. This is unlikely to the 'sky' mentioned above.
- There are two ways of subtraction as follows.
- For sparse fields, i.e., fields containing few stars (Sampling method)
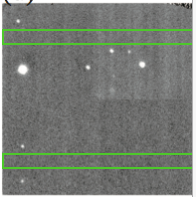
- Extract 20-100 lines without any stars, and average along the y-axis to obtain the 'stripe' pattern profile.
- Do the same procedure for both the upper- and lower halves.
- Subtract the 'stripe' pattern profile of the upper half from the upper half of the object frame,and vice versa.
- In the example above the regions outlined with the green boxes are used to obtain the 'stripe'-pattern proriles. The upper box region is used to obtain the upper-half profile of the 'stripe' pattern, and the lower box is used to obtain the lower-half profile.
- For crowded fields, i.e., fields containing many stars (Median method)
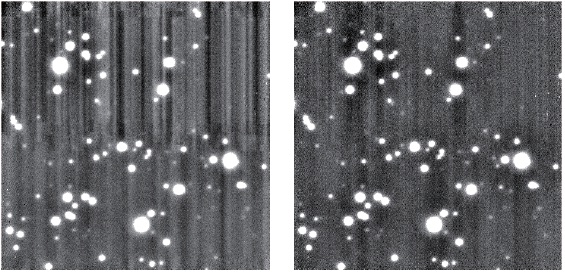
- 下図のような例では「星の写っていない行」がないため、全体を使う。
- 画像の上下半分でそれぞれ、各列のカウントの中央値 (median) を取り、縦縞パターンのプロファイルを得る。
- 縦縞パターンのプロファイルが得られたら、それをオブジェクトフレームから差し引く。
- 上図は、左が縦縞パターン除去前、右が Median 法による縦縞パターン除去後。全体の中央値を用いてもある程度縦縞パターンは除去できている。
- 自動解析スクリプトを用いると、*.sp.fits という名前のファイルに出力される。(下記は J band の例)
縦縞パターン除去後 j(date)_(frameID).(ObjectName).sp.fits [例] j120717_0098.SN2012dn_01.sp.fits
- この時点で WCS の貼り付けが成功したフレームに関しては、*spw.fits という名前の WCS 付きファイルも生成される。
8 & 9. 位置合わせ & 重ね合わせ †
- 基準となる星の中心位置を測る。(IRAF/imexamine、SExtractor 等)
- その基準星がディザリングセット内ですべて同一のピクセルに来るように、画像を平行移動する。(IRAF/images.imgeom.imshift 等)
- NIC はさほど視野が広くないため、ゆがみ補正などはひとまず考えなくてよい。
- 当然、ローテーターの位置角を一定にしておけば、回転なども考えなくてよい。
- 大きめのブランク画像(カウントは-10000とかの現実的でない値)を作ってそこにオブジェクトフレームを貼り付ければ、外縁部を無駄にせずに位置合わせができる。(自動解析スクリプトではそうしている)
- 平行移動によって位置合わせが出来たら、重ね合わせる。(IRAF/imcombine 等)
- 自動解析スクリプトの出力は以下の通り (J band の例)。
位置合わせ後 j(date)_(frameID).(ObjectName).sf.fits  [例] j120717_0098.SN2012dn_01.sf.fits
重ね合わせ後 j(ObjectName).cm.fits  [例]jSN2012dn_01.cm.fits
10. WCS 貼り付け †
- 視野内に写っている星を使い、2MASS 画像などを参照して座標を求める。
- IRAF でやる場合は、ccmap、ccsetwcs などを使う。
- ccmap : 画像に写っている天体の「X Y RA Dec」の対応リストを読み込む。
- ccsetwcs : 「WCS を貼り付けたい画像」「ccmap の出力ファイル」を入力し、貼り付けた画像を出力する。
- やり方は多数ある。astrometry.net などを用いてもよい。
- 参考リンク: WCSTools
- 自動解析スクリプトは WCSTools の imwcs コマンドを使い、2MASS 画像を参照して WCS を貼り付けている。現在のところ成功率は高くない。制御室の camera マシンでは、以下のコマンドを実行すると、位置較正のみを行うことができる。
camera% ds9 &
camera% getwcs.sh [ファイル名].cm.fits
- camera マシン以外では整備していないので注意。
- 自動解析スクリプトの出力ファイルは下記の通り。(J band の例)
縦縞パターン除去後+WCS  j(date)_(frameID).(ObjectName).spw.fits [例] j120717_0098.SN2012dn_01.spw.fits
重ね合わせ後+WCS  j(ObjectName).cmw.fits [例] jSN2012dn_01.cmw.fits
- 位置較正の過程で、ピクセルスケールを計算してヘッダーに書き込むようになっている。この値が設計値 (概算) である 0.16 arcsec/pix から大きくずれている場合は、位置較正に失敗している。
Revision history †
- 2019.09.10 Created based on the Japanese version (T. Saito)


